1-877-544-9023
9:30am - 5:30pm EST
Search
Filters
RSS

Blog

Third-Gen Chill Thrill - Upgrading A/C on a '87 Firebird Formula

Written by 

Original Article Here

For full step by step please visit this article

In ’80, Pontiac introduced the new R4 A/C compressor to some of its Trans Ams and Firebirds. Weighing in at nearly half the mass of the long-in-the-tooth A6 compressor, the R4 continued in the F-body line through ’92. It has earned a reputation as an unreliable design because it was prone to body and shaft-seal leaks, and seizing up due to the lack of an oil pan for oil storage.

Aftermarket replacement compressors have been available to consumers since the ’80s, but their focus was on reproducing the original, flawed part, without coming up with something better. Enter Classic Auto Air of Tampa, Florida, whose Original Air Group is dedicated to designing direct-fit upgrade A/C kits using modern R134a refrigerant (it’s no longer called freon!) in classic Pontiacs.

 “There’s a growing demand for replacement A/C components for Third-Gen F-bodies, and ’80s-era G-bodies,” says Classic Auto Air’s marketing/product development guru Dan Acosta. “The factory R4 compressor has proven to be the most common cause of A/C component failure in Third Generation Trans Ams and Firebirds. Most of these vehicles had factory air conditioning, and many of them are in need of repair and/or updating.”
1987 Pontiac Firebird AC upgrade Factory Issued Compressor
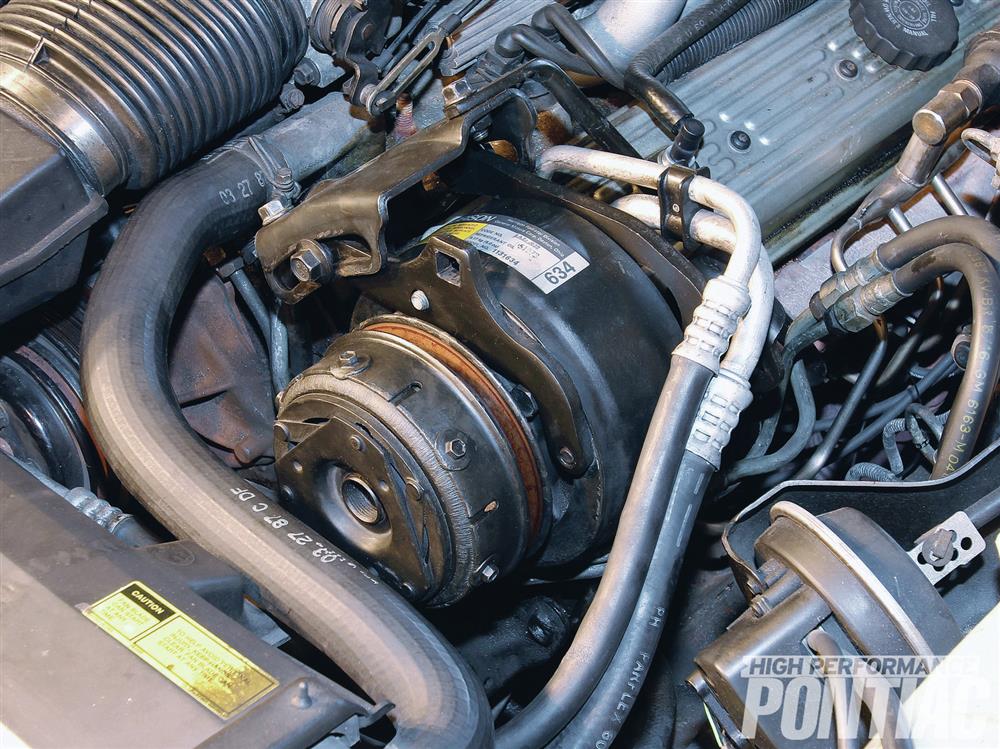
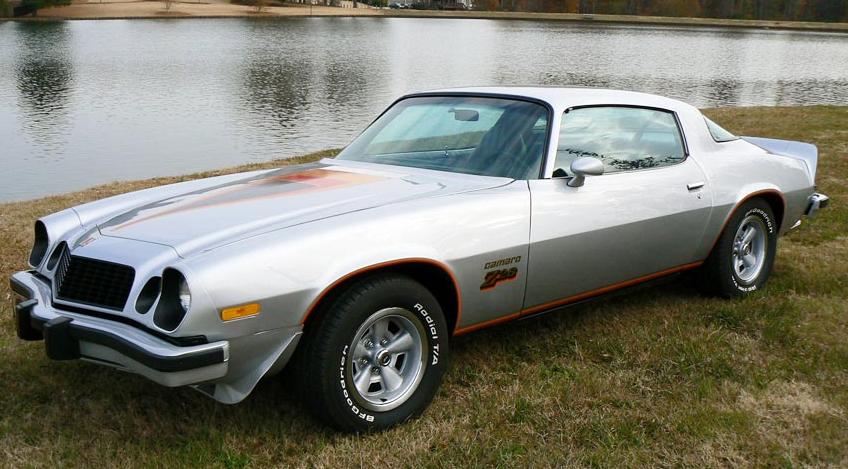
This Third Generation Firebird Formula has logged 96,000 miles since new and still retains its factory-issued R4 A/C compressor

1987-pontiac-firebird-AC-upgrade-new-condenser-CAA

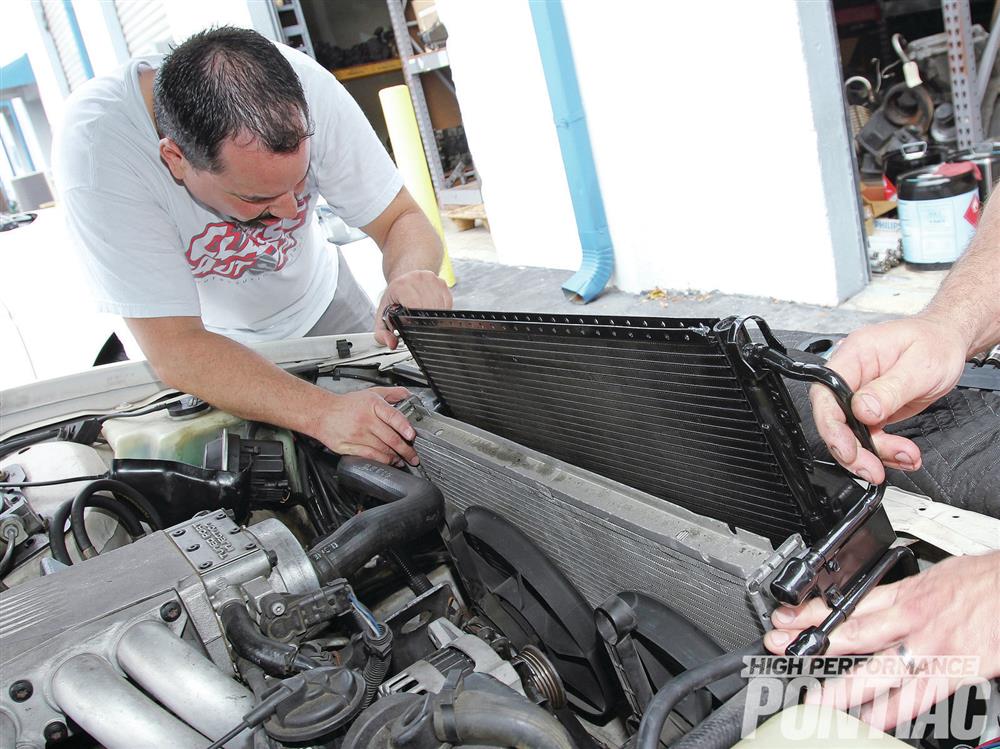
It’s time for the Stage 3 kit to be installed. Classic Auto Air’s team slid the new condenser into its space and made sure it mounted onto the two lower OE bushings. (Steps not shown: The men attached the upper OE bushings; aligned the upper-radiator-support cover and bolted it back into place, and aligned and fastened the air-plenum brace to the core support.
So far this year, Classic Auto Air has introduced direct-fit kits for ’86-’87 and ’88-’92 V-8–powered T/As and Firebirds. (Kits for ’82-’85 Third-Gen F-bodies and ’82-’87 G-body Grand Prixs are in the works; custom systems for these years are already available.) “In addition to keeping your vehicle worry-free cool, these high-performance kits reduce parasitic horsepower loss, which results in as much as a 5hp gain, and can safely operate up to 6,000 rpm,” Acosta says.

Classic Auto Air suggested its Stage 3 upgrade kit for the subject ’87 Firebird Formula equipped with GM’s corporate L98 350ci powerplant. Follow along as Classic Research and Development Lead Technician Mike Oliveras installs it.

Conclusion

Classic Auto Air says that the above steps can be accomplished by DIY mechanics, but evacuating and charging the new A/C system should be left to a licensed A/C professional. This particular vehicle took approximately 1.69 pounds of 134a refrigerant. The A/C technician must calculate the amount of 134a, which is generally 70-80 percent of the amount of R12 specified for the vehicle. That information is usually found on an evaporator-case decal or in the vehicle’s service manual.


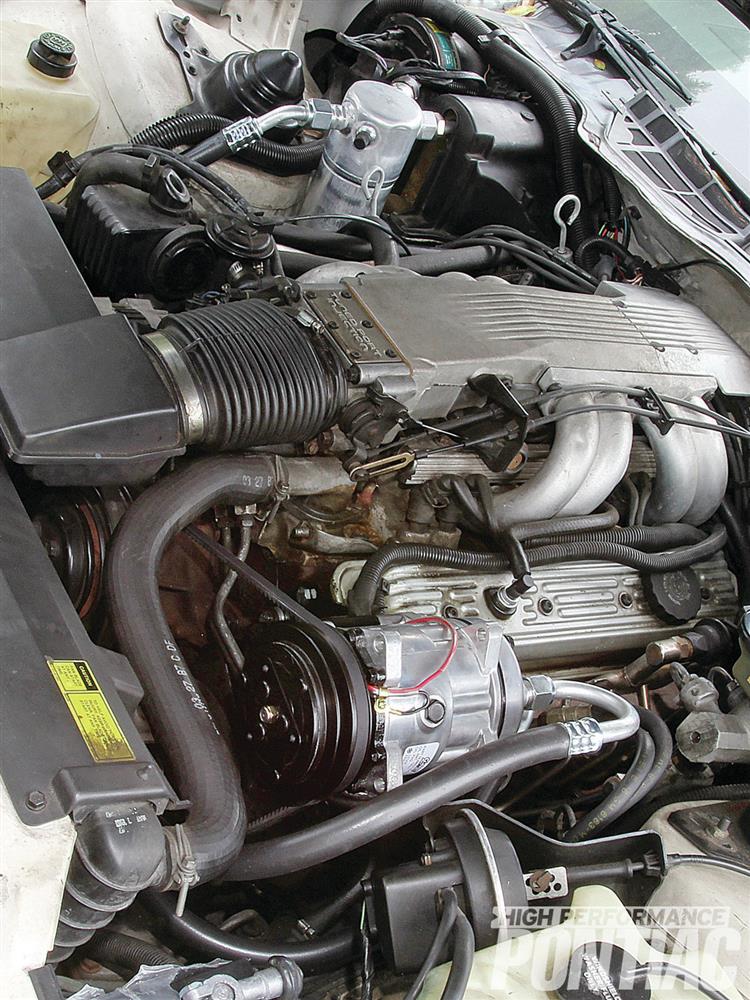
Oliveras connected the discharge fitting to the D-port of the compressor, followed by the condenser and suction fittings to the S-port of the compressor, and routed the former to the accumulator. He then installed the suction hose to the inlet of the accumulator. To complete the project, he reinstalled the air plenum and MAF.

Classic Auto Air’s Third-Gen A/C Upgrade Kits

Stage 1

Compressor upgrade, which replaces the unreliable and poor-performing R4 compressor with the dependability and efficiency of the modern rotary-style compressor
PN 23-261
MSRP $399.99

Stage 2
Engine compartment upgrade, which combines the Stage 1 kit with a direct-fit, high-performance parallel-flow condenser
PN 22-230
MSRP $699.99

Stage 3 (shown)
Deluxe engine compartment upgrade, which combines the Stage 2 kit with a new evaporator, effectively replacing all A/C components that contain refrigerant and lubrication, thereby eliminating any chance of system contamination
PN 22-230D
MSRP $749.99

Restoration versus Replacement

When it comes to restoring and replacing classic car parts, you obviously want to be sure you're making the right decisions for your car. If you're trying to decide whether to restore a classic car part or replace it entirely, look no further. Original Air has the answers you have been searching for. 

When should you restore and when should you replace? 

  • Restore: if you’re looking to keep the original, date-stamped parts that cannot be found elsewhere. If that is important to you and your project, restoration is the way to go over replacement. 

  • Replace: if the parts are available and serviceable. Depending on the classic car, the part you are looking to fix might not be available anymore, but if they are, replacing is the way to go. 

  • Restore: when it comes to evaporators and condensers, restoring can be nearly half the price of replacing in some instances. However, the downside of restoring these parts is that is difficult to accurately determine how long it will last, as those parts cannot be examined on the inside without being destroyed. 

  • Replace: if the original part is beyond repair but also important to the vehicle, replacing it is the best option. Many people restore classic cars with the intention of taking them to shows, but if you'd also like your classic car to be able to safely drive distances, replacing parts for functionality is the right choice. 

Determining whether to replace or restore a part can be a difficult decision when it comes to your classic car. You'll want to be sure that you aren't wasting your time or money. For any further questions, be sure to contact Original Air today!

The Chilling History of Auto Temp Control

It’s 2017 and we’re just on the tip of commercially producing self-driving cars. Automatic controls for our automobiles is all about the natural development of the evolution of the car. Cruise control, automatic transmission, automatic windows; we strive for comfort as we travel. Your automatic temperature adjustment in your car has been in development for almost 100 years now.

  • 1919 - The Kool Kooshion seat cover that uses small springs to hold drivers about a half-inch above the car seat, allowing air to circulate underneath them and behind their backs.
  • 1921 - The Knapp Limo-Sedan fan, a small electric fan that can be added to the inside of a car.
  • 1930 - The first example of a somewhat modern A/C feature the “car cooler” is developed. It uses water evaporation to cool air, which is then blown in through the open passenger-side window. A cool looking device, no less.

https://en.wikipedia.org/wiki/Car_cooler

  • 1939 – Packard begins to offer the next level in air conditioning as an option. The system, however, is in the trunk as opposed to the dash. It required you to remove the drive belt from the compressor to turn the system on or off. It roughly costs about $275 at a time when the yearly income was $1400. This option was short-lived because we swiftly dove head deep in World War 2.
  • 1953 – The return of air conditioning returns in the form of a rear-mounted system like Packard.

1953 Chrysler Imperial with factory trunk mounted “Airtemp” system. Photo Source.

  • 1954 – The first front-mounted A/C systems were put into production by Pontiac and Nash. Nash combined the heater and AC in one in-dash system, bring the standard that most cars have today.
  • 1964 – For the first time, drivers can set a preferred temperature, and the system will automatically adjust the A/C and heat. Cadillac introduces comfort control and the A/C game is forever changed.

The rest is all history, with developments in AC refrigerants, standardization of the modern A/C in the AMC Ambassador and by 69 over half of all American cars have A/C. Your modern A/C units were able to be recharged by 2003 with the launch of IDQ’s single can recharge system. At Original Air, we offer many products and services to help you keep your automobile cool when the sun shines down. Be sure to take advantage of this cool weather and send your parts in for rebuild today.

7 Things You Might Not Know About The Chevelle

If you know anything about cars, you know the Chevrolet Chevelle is one of the most celebrated vehicles to ever sport the bowtie. While only being in production for 13 years the Chevelle left an impression on the car industry that stands the test of time. At Original Air, we know you take pride in your vehicle and we want to make sure you stay cool in one of the coolest cars on the planet. Despite being an open book because of its popularity here are some things you may not know about the Chevelle.

1. Chevelle shared its A-body platform with the El Camino and the 70’-72’ Monte Carlo (though it was coded as a G-Body in the latter).

2. It was built in 10 different plants in 2 different countries, Arlington, Texas; Atlanta, Ga; Baltimore, Md; Flint, Mich; Framingham, Mass; Fremont, Calif; Van Nuys, Calif; Kansas City, Mo.; Oshawa, On, Canada; and Sainte-Thérèse, PQ, Canada. Many of these same factories produced the legendary Monte Carlo as you can see below.

3. The Canadian Chevelle had only slightly different traits in the trim and the grille, it was also dubbed the Acadian Beaumont.

4. The ’65 Chevelle was notably different than its later model years.

Youtube Source

5. Appearing in over 1,600 movies and TV shows the Chevelle is one of the most popular little and big screen cars appearing in such movie franchises as the Fast & Furious.

6. If you happen to see a woodgrain console Chevelle it was taken from a Monte Carlo as no Chevelle’s had woodgrain consoles.

7. One of the most expensive cars to ever be sold at auction a 1970 Chevelle SS 454 LS6 sold for $1.15 million dollars.

Whether you’re a diehard Mustang owner or champion for the Camaro you cannot deny that the Chevelle is one of the greatest automobiles to grace the streets. Let us help you keep your legend cool with our original factory parts for the Chevelle’s AC.

5 Things You Don’t Know About 2nd Generation Camaros

Everyone loves the classic Chevy Camaro, they’ve been around for 51 years now and there is no end in sight to the love the world over has for this classic American muscle car. We work with all kinds of original first-generation Camaro builds to bring you the coolest AC for your ride but you may be surprised by these little-known facts about this American classic.

1. The second-generation Camaro may not have the classic look that car collectors froth at the mouths for but this fine example of an American classic SOLD BEST in 1979 with 282,571 sales.

2. The first cars produced in 1970 were really 1969 Camaros, because of issues with the production of the Euro-inspired sheet metal design for the second generation, Chevy built ’69 Camaros as 1970 models for 4 months.

3. GM conceived of a WAGON version of the Camaro but decided to strike that from production be they completed a fiberglass Firebird build outdone by Pininfarina later on.

4. Second-generation Camaros drew inspiration by the classic Ferrari Lusso 250 GT. Not only did these please people like Steve McQueen but designers at GM incorporated “a European grand-touring aesthetic” to the body.

5. The returning year of the Z28 in 1977 was the year that Camaro for the FIRST time EVER beat out Mustang in sales! The Z28 sold 14,349 models helping sales of all Camaros reach 218,853.

No matter who you are, the world over agrees that the Chevrolet Camaro is one of the most legendary muscle cars out there. If you’re looking to be cool and stay cool when the heat is on Original Air has you covered for your original AC kits.

5 Things You Don’t Know About 1st Generation Camaros

Everyone loves the classic Chevy Camaro, they’ve been around for 51 years now and there is no end in sight to the love the world over has for this classic American muscle car. We work with all kinds of custom first-generation Camaro builds to bring you original AC parts for your ride but you may be surprised by these little-known facts about this American classic.

1. Chevy had three different assembly locations for its first-generation Camaro, Van Nuys, California, Norwood, Ohio predominantly but it ALSO was assembled in the Philippines, Belgium, Switzerland, and Peru.

2. GUY FIERI rocks the classic 1968 ZZ502 BUT it does NOT belong to him it belongs to his hit show Diners, Drive-In, and Dives! The show originally featured a 67’ Camaro SS which belonged to the show’s former producer. Photo by: Guy Fieri’s Facebook Page

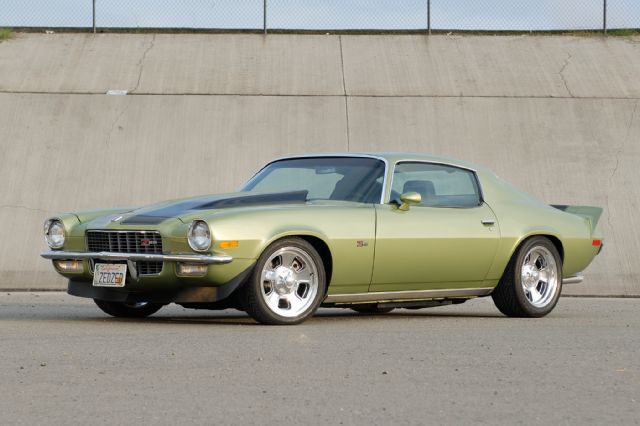
3. There is only ONE 1968 Z28 CONVERTIBLE in existence and it was specifically built for Chevrolet GM Pete Estes. This was a play by GM to convince him to keep the Z28 in production for 1969. The beautiful piece of history went for auction in 1991 for $100k! Photo by:
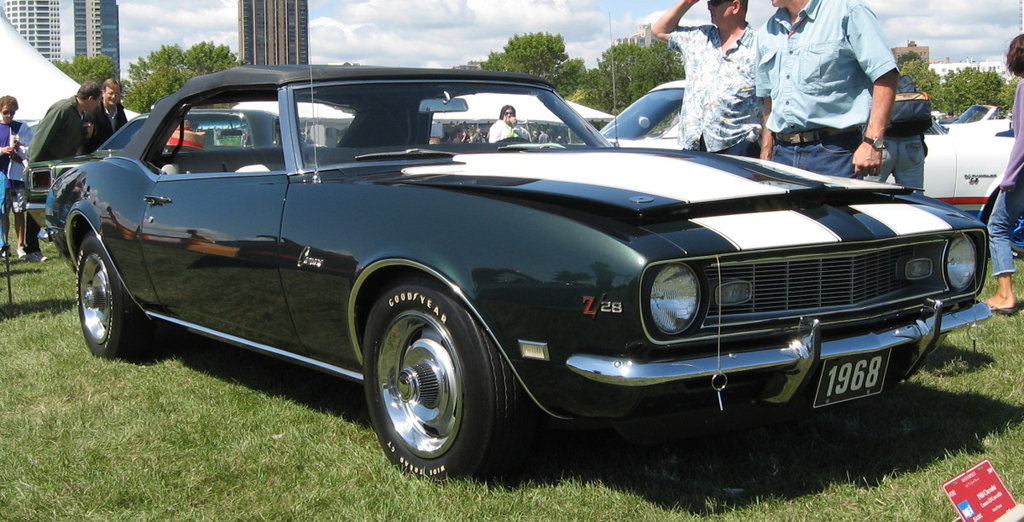
 motoryeti

4. Arguably, the 1969 ZL1 Camaro is the most valuable production Camaros it is considered one of the “blue chip” models for muscle car collectors. They were all built with a special order COPO system with an all-aluminum 427 big-block system. Photo by: Mecum Auctions

5. The modern version of the ZL1 wrecks the original generations by an immaculate 125 horses! Photo by: cartechbooks

Photo by: About Muscle Car

No matter who you are, the world over agrees that the Chevrolet Camaro is one of the most legendary muscle cars out there. If you’re looking to be cool and stay cool when the heat is on Original Air has you covered for your original AC kits.

Tips for Restoration

Restoration is the process of reconditioning a vehicle from its current status to what it once was. It is not uncommon for owners of classic cars to want to restore their vehicles to their original factory glory. A complete restoration project would include more than just the outside appearance of the car, but the interior and mechanicals as well. 

 If you are considering restoring your car, here are some tips for the restoration of factory items. 

  • Make sure you have enough physical space to complete the project. Restoration takes time, as you probably know, but you will also want to ensure that you have enough space prior to beginning your restoration as well. 

  • Use the factory assembly manual. Even if you feel confident you know what to do, using the factory assembly manual ensures that nothing you do will potentially harm the car, decrease its value, or delay the restoration process. It will also help you outline and stay within your price budget by outlining what exactly you will need. 

  • Chances are, you will probably come across a setback at some point in the restoration process. If the setback is too large or costly to handle alone, contacting an expert or Original Air can save you money. 

  • Before disassembling the parts, make sure they are all functioning. This will save you time in the long run so you do not stumble across a malfunctioning part later on. If you have to replace parts, you can find and order them at the beginning of the restoration process, rather than putting the process on hold as you order them later. 

With these tips in mind for restoring factory items, we hope your car restoration project is an enjoyable, efficient experience for you. If you need help finding or installing new items, be sure to contact Original Air for assistance. 

Should You Buy a Part or a Kit?

If you need to repair your muscle car's air conditioning system, you might be faced with deciding whether to buy just the specific part you need or a complete kit that includes more than you might immediately need. The best answer probably varies on a case to case basis, but if you need help deciding which is best for your situation, consider the following: 

Should you buy only the a/c part you need? 

  • If you are confident that buying one part will fix the problem your car's air conditioning, then go for it. There is no point in preempting a problem that you are confident will not come up again in the near future. If the problem is quite obviously a broken hose, buy just the a/c hose to replace it.

Should you buy the whole kit? 

  • If you only order one part, you have fixed the immediate problem, but risk troubleshooting in the future. You can fix the rotary compressor today, but there's no guarantee that the expansion valve will not break tomorrow. While you are already working on your air conditioning, you can save time and money by purchasing a complete air conditioning repair kit.

  • If you purchase the complete air conditioning kit, you have the opportunity to upgrade your air conditioning system. Many muscle cars originally use R12 but R134a might be better for you. If you already need to fix your air conditioning, upgrading could be beneficial and convenient. Nobody wants to have semi-functioning air conditioning, especially in the middle of summer.

When deciding between buying a specific part or a whole kit, you are surely going to want to measure the pros and cons of each to ensure that you are saving yourself the most hassle and money as you can. Hopefully, with these tips in mind, you can choose which method will be the best choice for you and your car. 

A Cool History on A/C in Automobiles

first automobile with ac

When you get into your car that has been baking in the summer heat of a supermarket parking lot for the past two hours, the first thing you do is crank up the air conditioning and try not to burn yourself on the seatbelt as you buckle up. You probably don't stop to consider what you would have done if your car was not air conditioned, or how it came to be that way. The history of A/C in automobiles, though, is quite an interesting one.

The first automobile manufacturing company to have air conditioning was Packard in 1939. However, for a number of reasons, it did not do well on the market, especially considering it was an expensive, flawed option in cars that most post-Great Depression American consumers did not want to invest in. It was therefore discontinued in 1941. Cadillac experimented with air conditioning in 1941, which was also rather unsuccessful.

Then, the Chrysler Airtemp was introduced in 1953. This system was more successful than Packard's or Cadillac's previous models because it was most effective and activated with a switch on the dashboard with three levels of power, closer to today's A/C systems in cars.

A year later, the Nash integrated system became the first heating, air conditioning, and ventilating system. Where most systems used a separate heating system, the Nash integrated system was unique in its dual nature and found success because of it.

Car coolers with evaporative cooling were popular up until the 1960s. They were the most successful in drier parts of the United States because they relied on low humidity, but until interior air conditioning systems were improved upon, car coolers were a sufficient way to cool a vehicle.

From there, air conditioning in cars continued to evolve into what we have today. Modern air conditioning units in cars run on power consumption, using horsepower from the engine to cool the vehicle. Although most days, we do not think much of our car air conditioning unless it is not functioning properly, modern car air conditioning was derived from various types of air conditioning systems over the years before it came to where it is today.

Did you know there is a proper procedure for the installation of O-Ring A/C fittings?

The first thing to do is to inspect fittings to be used to ensure they’re free of contaminants and/or damage. This is very important to ensure not only a leak-free seal but to prevent from contaminating newly installed or cleaned components.

Even the most minor dirt or contamination on o-ring seats can prevent a fitting from sealing once tightened. Imperfections in the o-ring seat such as this can prevent a fitting from sealing or cause an o-ring to split once tightened.

Next, lubricate the o-ring by rubbing a drop or two of oil on the surface until there is a light oil film over the entire o-ring. Install the o-ring to the o-ring bump and connect the fittings.

This is where many people unknowingly get into trouble. Contrary to popular believe, o-ring fittings don’t require significant tightening. Over-tightening can cause many problems, but the most common issues that arise from over-tightening an o-ring connection is splitting an o-ring. This can happen right away, or sometimes later on down the road.

The general rule for properly tightening an o-ring fitting is hand-tight, plus a quarter turn.

Connect the fittings and tighten by hand. Once completed, use two wrenches, positioning them ¼ turn apart [show starting position of 12 o'clock]. With both wrenches held at the 12 o’clock position, hold one in place and tightening to the 3 o’clock position with the other wrench.

Keep in mind that because “hand-tightening” can vary from person to person, it’s essential to do a thorough leak-check once the initial system charge is added to the system, and once again after fully charged. A minor adjustment to fitting tightness may be necessary.